At first glance, looking into the world of pointed pen calligraphy can tend to feel a little overwhelming. Hopefully in this article and the next few articles as well, I can help de-mystify a little bit of the uncertainty for you so that you can learn what you need to know to begin your writing journey.

Anatomy of the Pointed Pen
Pointed pen calligraphy requires the use of a nib holder and a pointed pen nib. The nib is the part of the pen that you dip in the ink and use to draw your letters.
There are two types of pointed pen nib holders: straight and oblique. The straight holder looks just like a pen without a tip. It has an opening at the end that allows you to insert your nib directly into the end of the holder.
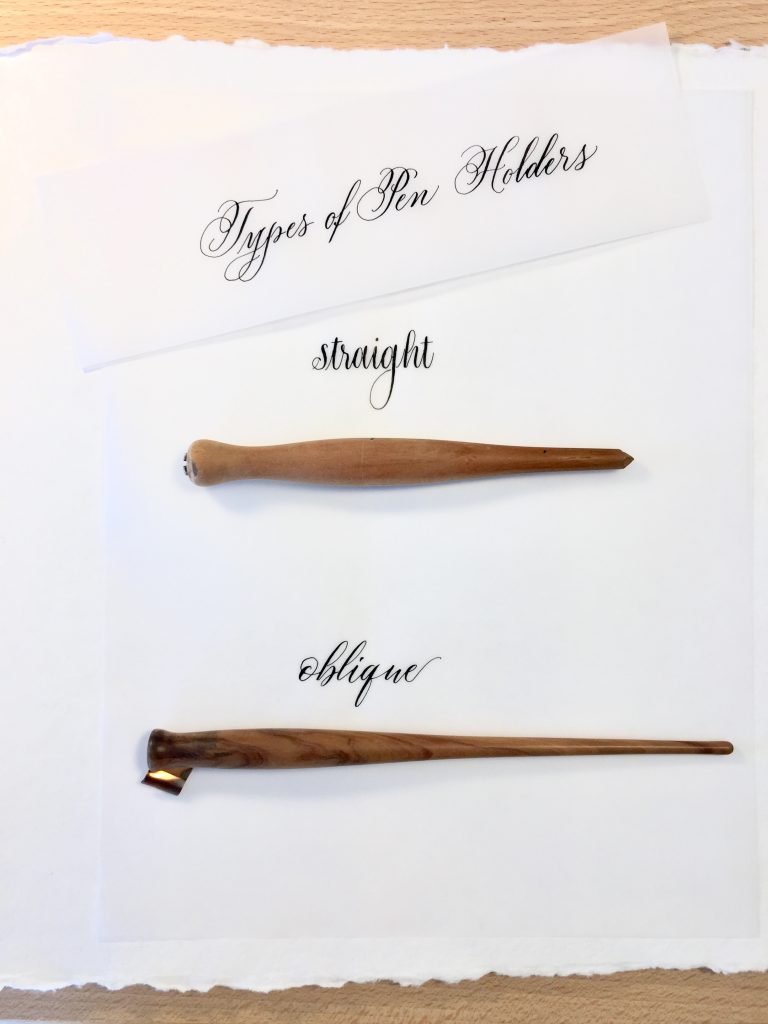
Straight holders are useful for creating calligraphy scripts with very little slant and for offhand flourishing or other calligraphy artwork.
Oblique holders have a flange that sticks out to the side at an angle to hold the nib. This angle allows you to produce writing at a slant while still using a natural pen hold.

Oblique holders are most helpful when writing calligraphy styles that are heavily slanted, like Copperplate (55º slant), Spencerian (52º slant), and modern calligraphy scripts that are slanted. (For my personal modern calligraphy style and brush calligraphy I use a 65º slant.)
How the Pen Works
The nib is shaped in a concave manner so that it can hold a good amount of ink, allowing you to write a word or two before having to re-dip the pen in the ink. This area of the nib is called the reservoir.
When pressure is applied to the nib, the two tines spread apart, allowing ink to flow to the paper in generous proportion. When pressure is released, the tines then snap back together and give a minimal amount of ink flow.
This difference in ink flow is what allows the calligrapher to draw varying thicknesses of ink to give the fine-appearing hairlines and the nice thick-looking downstrokes. We call these thick downstrokes “shades.”
-

- Apply gentle pressure for downstroke

-

- Release pressure for the hairline upstroke

Differences in Pointed Pen Nibs
Different nibs have varying amounts of stiffness/flexibility that greatly affect both the thickness of the shade and the thin-ness of the hairline. There are other differences in nibs too, like their compatibility with certain types of papers, how smooth or scratchy they feel, and how long they last.
Each person tends to develop a preference for a particular type of nib based on the amount of pressure they naturally assert on the pen. Beginners almost always tend toward heavier pressures than experienced calligraphers, and as the writing muscles are not yet fine-tuned, beginners are recommended to learn with nibs that are stiffer and can handle the higher level of pressure without releasing too much ink.
Like-wise the stiffer nibs are more forgiving with a little bit of shakiness on the hairline strokes, whereas more flexible nibs tend to react more quickly with a shaky hand and give uneven strokes.
The Best Pointed Pen Nibs for Beginners
I almost always see Nikko G nibs being recommended for beginners. However, I prefer to recommend the Zebra G nib, because it has a very similar flexibility, but a smoother writing experience. If you are just starting out with learning calligraphy, purchase as many different nibs as you can afford so that you can see the difference and determine which ones you like better than others.

Nibs are also rated by the range of x-heights they can accommodate. X-height refers to the measurement of the height of the lowercase letterform. Very small x-heights absolutely require extra fine nibs that are made for writing very small letters. The opposite concept is true for writing larger letters.
In future articles we will explore specific nibs in more detail and do some side-by-side comparisons.
How to Use a Dip Pen for Pointed Pen Calligraphy
In today’s article we looked at the very basics of dip pens, including the anatomy of the pen, how the nib works, and differences in nibs. I also gave you my recommendation of the best pointed pen nib for beginners.
In the next article in this two-part series, we will look at a step-by-step approach for how to properly use a pointed pen.
My Supply Recommendations
If you don’t already have your pointed pen supplies, I have some specific recommendations on my supplies page as well as on my beginners page. It would be a great a idea to go ahead and purchase these supplies so that you will be ready to get started when I post part 2 of this article in a couple days.

