This is the time of year when people address more envelopes than at any other time. Whether or not you’re using a pointed pen, it is still desirable to have straight lines that are fairly centered between the margins.
 In this post, I’m going to show you my favorite way of centering addresses on envelopes. I’m also going to give you my favorite tool that you can download and use when you are addressing your Christmas and holiday cards.
Different Methods of Centering on Envelopes
There are several different ways you could go about centering your address, and I’ve used different methods through the years. You could get pretty intricate with this task and write the address on scratch paper first, then get out your ruler and start measuring, marking, and otherwise giving yourself a headache. If this were a one-off piece, it might be worth that migraine. If you’re mailing several dozen cards, however, who has time for that?
My Easy Method for Centering Addresses with Calligraphy
So I have a simpler method I use.
1. Type and Center the Address
 First I start at the computer. I type the addresses in a word-processing program, and if this is a large mailing list, I’ve already mail-merged from my contacts app so I’m not actually typing these addresses individually. But this is not a tutorial for how to mail merge, so we’ll save those details for another day.
Once I have typed the addresses, I center them, and then I select a font that is similar to my handwriting style. You can go to dafont.com to get free fonts, and search for a font that looks sort of like your writing.
I also enlarge the text so that the size of it matches the size of my guidelines I’m using for the envelope. This gives me a really good estimate of how I need to align this address to fit my envelope.
2. Print the Address
Then I print the address and place it nearby so I can use the spacing estimates. And I do mean estimates here, because no matter how close your writing style is to the one you printed, you are still going to vary from time to time the way that you make your letters and connect them, so it’s not likely that you could easily address two identical cards.
That is the beauty of hand-drawn calligraphy, though. If you wanted it to look computerized and perfect, you could have just printed it.
 3. Create an Envelope Template
The next thing you need to do is prep your guidelines. If you have envelope guidelines or another guideline sheet you prefer, than you can start with that. If you do not already have something you want to use, you will want to download my free guideline pack, available to all of my newsletter subscribers. After downloading and printing these guidelines, select the one that has the spacing you prefer for your envelope. Then cut it to the size of your envelope, but about 1/8″ smaller, so you can easily slip it in and out. You can subscribe to my newsletter here, then check your email for instructions on downloading the free guidelines.
Some calligraphers prefer to print these on transparency sheets for durability and maximum transparency.
 Measure your guideline sheet and draw a vertical line on it that is centered horizontally. This gives you some bearings when you write each line, so that you can gauge your progress and see if you feel that you need to expand or tighten up your spacing as you go to keep your line centered overall. We will call your guideline sheet an envelope template from here on out.
4. Measure the Placement of Your First Line
 Once your envelope template is ready, place it under your printed address and visually center the address over the template. A lightpad is helpful for this step. For the first line, measure the distance from the edge of the envelope template to the point where your pen will first touch the paper on the first stroke. Make note of this measurement.
5. Insert Envelope Template Inside of Envelope and 6. Place on Lightpad
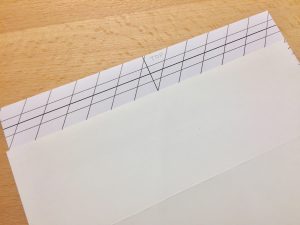 Insert your envelope template into the envelope, place on lightpad if you have one, or if you can’t see the lines through the envelope, you can use a guideline ruler to draw the guidelines on your envelope, or use a laser light level (like the one on my supplies page) to shine the line across the envelope.
7. Mark Your Starting Point
 After determining which guideline will be the top line of your envelope, lightly mark with a pencil the measurement you took earlier to give yourself your starting point for the first stroke of the first line.
8. Write The First Line
Then write the first line.
9. Estimate Centering and Write Remaining Lines
For each line after that, use your typed address to give you an estimated starting point. This will not be exact, but it’s fairly close, and you will have more fun than if you are measuring every single line.
 10. Add Flourishes Where Needed
Last but not least, if you see that any of your lines are too far off center to be visually pleasing, add appropriate flourishes to help balance out your lines.
Then don’t forget to remove your envelope template.
So let’s sum this up with a brief bulleted list of instructions.
How to Center an Address on an Envelope
- Type the address in a script font and center.
- Print the address.
- Create an envelope template.
- Measure the placement of your first line.
- Insert envelope template inside of envelope.
- Place on lightpad.
- Mark your starting point.
- Write the first line.
- Estimate centering and write remaining lines.
- Add flourishes where needed.
Supplies I Use to Center Addresses on Envelopes
- Pointed pen, ink, paper as shown on my supplies page
- Pencil, ruler, envelope of your choice
- Guidelines
- Artograph 940 LX LightPad light box, 12 x 17 inch lit area, Silver
While there are certainly other methods you can employ to center your calligraphy on your envelope, I personally find this one to be the best balance between accuracy and fun-ness. The more experienced you get, the less you may need some of these steps, and the better you will get at estimating your starting points.
Sometimes I throw up my hands and decide to go rogue and just totally wing it with my centering. I disappoint myself with this method every single time, but the truth is, the recipient is very unlikely to actually notice imperfect centering.
And sometimes it is just easier to stagger the lines from the left side and let the right side fall where it may. This still gives an appearance of being centered, even though it probably isn’t.
If you have a favorite way you deal with centering addresses on envelopes, I would love to hear about it. Drop a comment below and give me your best advice. And if you have any questions, I’ll do my best to answer them.
I’d also like to connect with you on Instagram, so follow my feed @Kallialitheia and comment there to let me know what you think about this post.
Enjoy this season as you celebrate with friends and family, and check back soon for the next post.

